This is a brief guide about opening the scanner body and cleaning the internal side of the glass. After some years, the scanner works perfectly, but some tiny particles can accumulate inside and produce strange little spots over the scanned images.
You will need:
- a Phillips screwdriver (cross head, to remove screws)
- a little flathead screwdriver (to separate parts)
- a clean microfiber cloth
- a glass detergent or water for extra safety
1
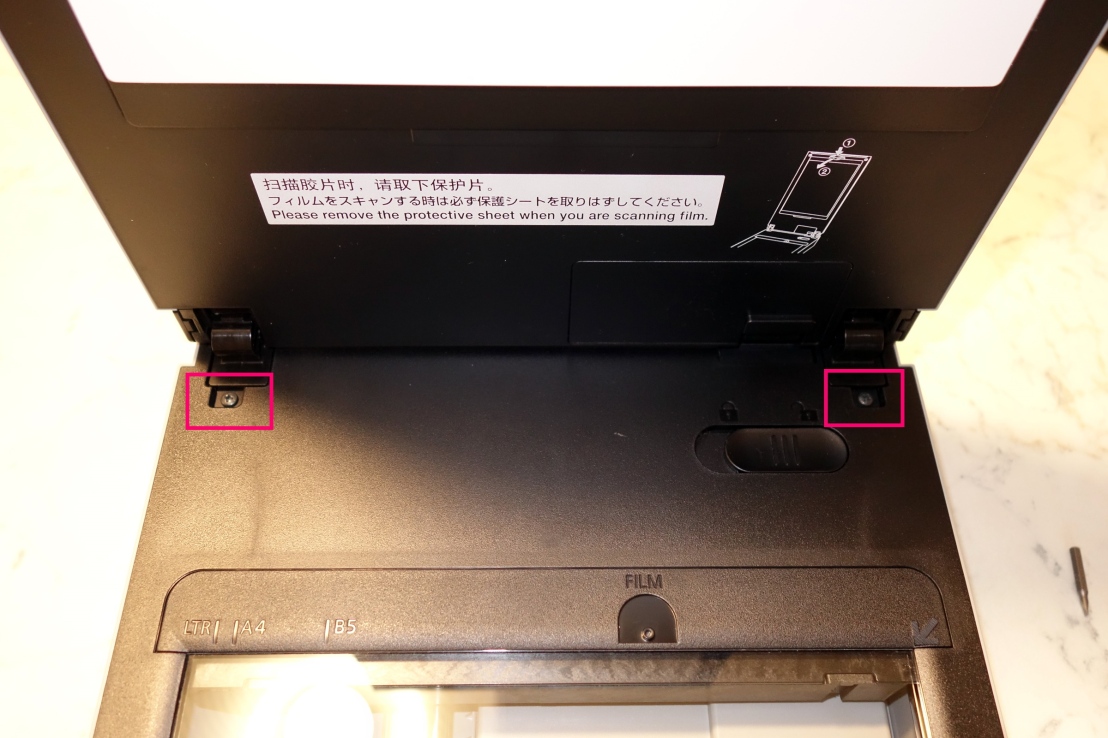
Open the cover.
Remove the 2 screws.
NOTE: there is no need to unlink the flat cable that connects the top with the main body, but be careful to do not stretch it.
2
Remove the black plastic front cover by first releasing the small clip at the bottom and then pulling it up. It may be easier to flip over the scanner and use a flathead screwdriver as lever between the gray edge and the black front cover.


3
Remove the 2 other screws.
Then, push the plastic frame containing the glass towards the other side (where the front cover was mounted). You can insert the flathead screwdriver between the grey frame and the black glass frame and use it as a lever. Do it gently to avoid damaging the plastic parts.


4
Now the glass frame should be released and you can lift it up and clean it.


Thanks for this. I would have been in deep trouble without it. My scanner is next to a window, and when I went to scan a document today, I found tens of thousands of black ants inside the scanner. After using your guide to get the glass off, I had to dismantle a lot more – the ants were nesting in every nook and cranny. Ant eggs and ants everywhere! What a nightmare! Yes, I managed to break one of the plastic clips on the front but a small price to pay. Perhaps you need to emphasise that the glass holder is clipped into the back of the chassis and a table knife nicely ‘lifted’ the clips before I could slide the glass forward, But other than that minor point, a great guide. Thanks again.
Also, big thanks from me for this helpful guide!
HINT FOR REMOVING THE GLASS PLATE (STEP 3):
It is easy to slide the glass plate forward if you place a finger into each of the two holes that held the cover and lift the back of the glass plate up a little. The whole plate can then easily slide forward. No need to use much force or a screw driver!
Thanks Olaf for the good advice, and sorry if I replied so late, I didn’t follow much my blog lately.
I did this today, but I think I have put it back together wrong. It was very difficult to get the top glass and the plastic back on tight. Also, the locking symbol cannot move into the locked positon, so I think that I have put something back wrong. When I scanned some negatives, they are so off centre it is quite disconcerting. About 20% of the image is missing, the bottom being cut off and above the negative blank space.
I will try and take it apart again tomorrow and be a bit more systematic. Unfortunately there is so much dust in the top lighting part, how it got there, I do not know. How I will remove it, I also do not know.
Maybe I stretched the cable 😦
Thanks Doraz from a cold and wet South Africa. I was stuck because of ants invading my scanner. Your article made it easy to open up. Hope I vacumed all the ants out. Regards. Fred van Lith, Somerset West, South Africa.
Excellent guide – many thanks
My black plastic front cover could be easily be released by inserting a flat blade screwdriver in square hole in the bottom front of the scanner.
Very good content i find many way to clean the glass inside Thank you
Hello,
I have dirt behind the lamp in the lid. Any hint how the lid can be disassembled?
Thanks